With my lack of blogging this fall...winter...ok, first semester, I decided to compile a mega blog post of vocabulary resources that you can customize. I tried to make them self-explanatory and easy to use in Word or PowerPoint. You can use them by opening the document, adding whatever text you need/want in whichever areas you deem necessary, then print. Yes, many times we ask our students to create their own foldables from start to finish. I have found especially with my little second graders, that sometimes with just a little bit of it already filled in, they are more focused on what I want them to remember...THE MEANING!!! (It is also less intimidating to them if I don't hand them a blank piece of paper and say, "OK, make a foldable with these 6 new words. Good luck!")
You may have to play around with your printer for any that require printing on both sides. For my printers at home and school (both HP), I print one side, turn the printed side over so that the blank side then faces up, place that stack in the bypass tray (blank side up), and then print the second side. Voila...it works! Play around with yours, and I hope it works for you on the first try! [fingers crossed]
So, here are some free goodies for you, and I hope you are able to use them and adjust them for your students. Many of these foldables can be glued into your students' interactive notebooks so they can be used as resources later on.
Oh, one more thing...what you see below are screen shots, but I've hyperlinked everything for you because I love you. They are all editable documents that you can download for free...again, because I love you. :)
WARNING: Sometimes, when you see these documents in Google docs, they look like a hot mess! In the top right corner, look for DOWNLOAD ORIGINAL. When you open them in their respective programs, they are totally fine and normal and calm like your students moments after your principal leaves your classroom from doing an observation or walk-through. If you have any problems, just email me and I'll hook you up...because I love you. :)
Vocabulary Flip Flap Book Title on Top
*print page one first; then print page two on the back of page one
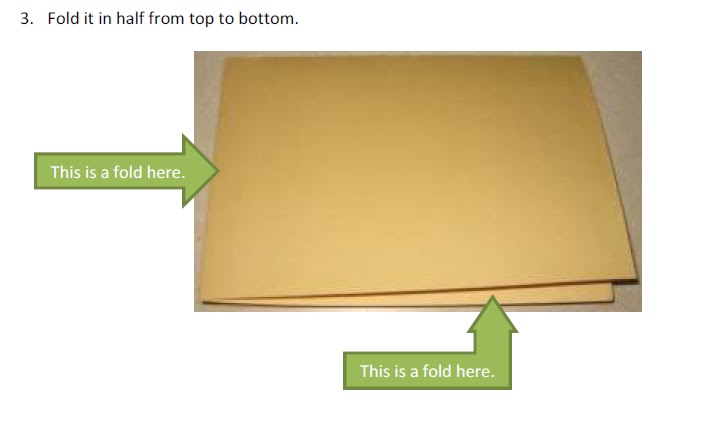
*fold the page in half and cut along each line to create flaps that open up revealing definitions
*you can do without the title
*I made this one with my kiddos, and I scanned a finished product into my computer which I don't have access to right now. As soon as I get access to it, I'll upload it.

*Fold the page in half and cut along each line to create flaps that open up revealing definitions.

Vocabulary 3 Door Flip Flap Book
*Cut on dotted lines and fold flaps in towards middle.
*The solid lines in the middle do not really serve a purpose since anything that is written would be written on the reverse side of the text you see. However, they would be faintly seen and could serve as a guide for students. You can also have students fold on those lines so that fold lines are created which would then create more evident boxes for students to write in.
*Definitions can be written (by students) on the inside "flaps" or areas.
*There are two different page orientations for you to choose from.


Vocabulary 4 Door Flip Flap Book
*Cut on dotted lines and fold flaps in towards middle.
*The solid lines in the middle do not really serve a purpose since anything that is written would be written on the reverse side of the text you see. However, they would be faintly seen and could serve as a guide for students. You can also have students fold on those lines so that fold lines are created which would then create more evident boxes for students to write in.
*Definitions can be written (by students) on the inside "flaps" or areas.
*There are two different page orientations for you to choose from.


Four Corner Mini Book
*This is so versatile!
*This is another one where you will print on page one, flip it and print on page two.
*Or you can add text to the corner triangles (on page one) and have your students add their ideas to the inside squares/diamonds (on page two).
*Just fold in half and half again first; open up.
*Then just fold your corners down.
*The orientation of this flip book can be more like a diamond...just rotate it so that the corners are at the top and sides.


* I just love word families especially for primary students, struggling readers/spellers and ELLs

Four-Square Foldable
*I've used this type of foldable for many things. The Frayer Model is how I've used it mainly, but it can be used in many ways.